With OnSinch you do not have to manually sign staff members to jobs. You simply publish the shifts, set requirements for each position if needed and let your staff members sign up for shifts by themselves directly from their account. This saves your coordinators valuable time while still having full control over the occupation of the jobs.
Available shifts
Staff members can search for available shifts from the main page of their account or browse through a list of available shifts. They can see the very basics about the positions here.

- Featured shift - shifts set as featured are shown on the top of the list of available shifts.
- The shift to which the staff member is already signed up is shown in green.
- The purple icon indicates that staff member can sign up only as an applicant.
- The chain symbol shows grouped shifts - staff needs to work on all grouped shifts.
- Staff member can also see what other shifts are happening at the same time as the shift to which they are already signed up.
Shift detail & signing up for the shifts
Staff member can open the shift detail page to see full information about the job and sign up for it too.
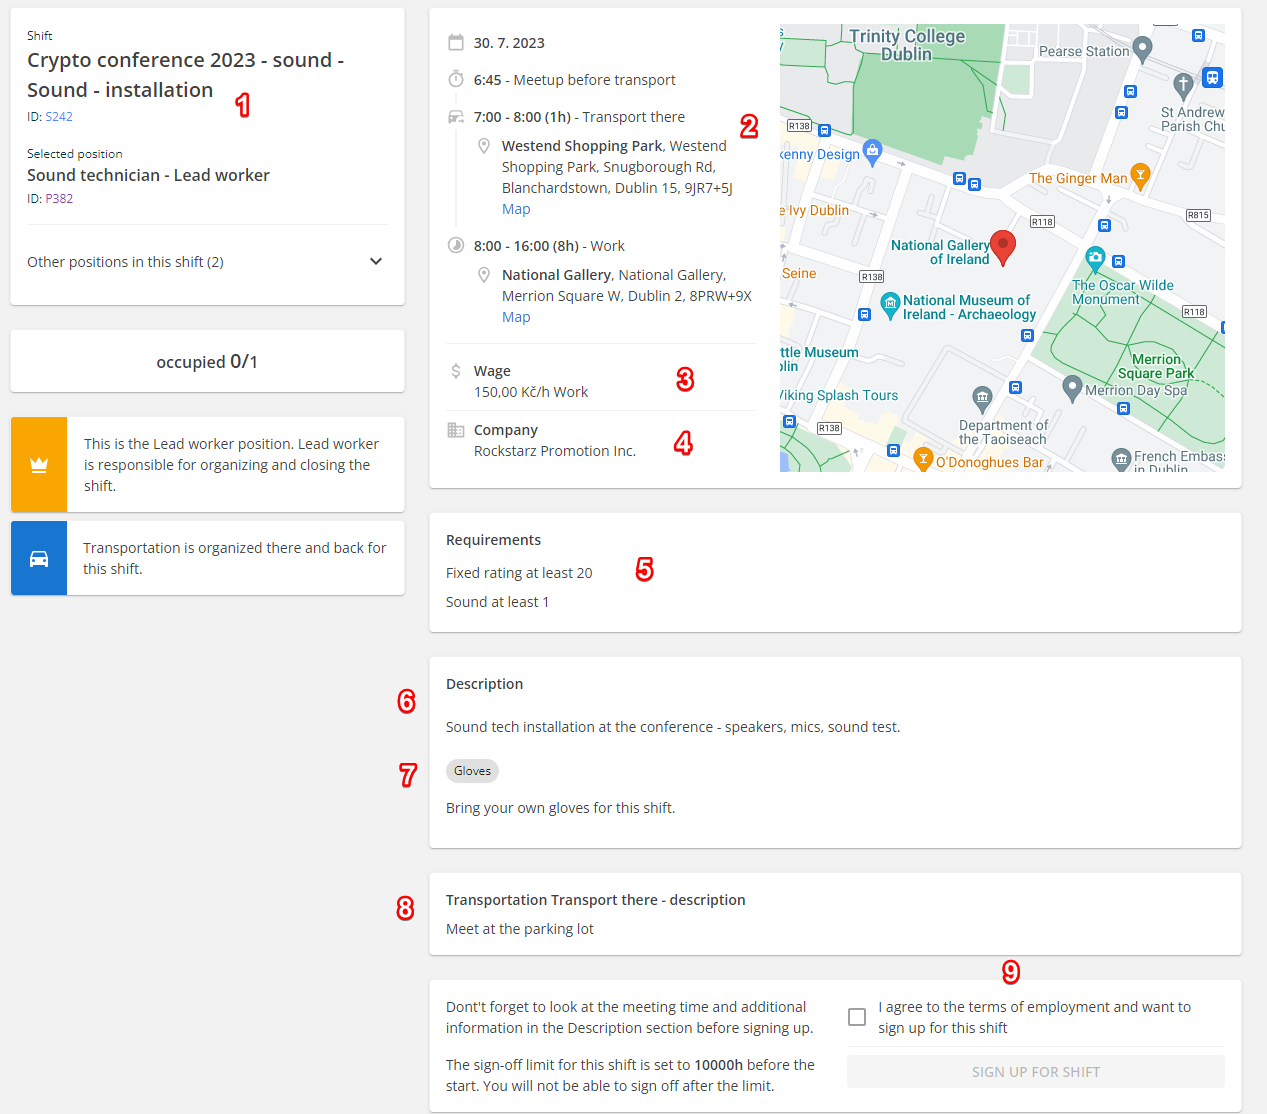
- Job, shift, and position names alongside system IDs.
- Time schedule and location - meeting time, work time, and transport if included.
- The estimated wage they will receive to their wallets after the shift is closed.
- Name of the company you provide the work for (this can be hidden).
- Requirements that are needed to work on the position. If the staff member does not meet the requirements, they would see it here.
- Public shift description.
- Tags associated with shift/position.
- Information about provided transport.
- If the staff member can and want to, they can sign up for a shift.
Once a staff member signs up for the shift, you will immediately see them on the shift page among signed-up staff or in the pending applicants section.
💡Read the full article about applicants for more information about this feature.
Signing off the shifts
Staff can sign off from the shifts the same way as they signed up - on the shift detail page.
You can set the latest time before the shift starts, after which the staff members can no longer sign themselves off (this can be set for each shift differently and/or by default in Agency settings). Staff can never sign off by themselves from locked positions.
Attendance watcher
You can be notified via email everytime anyone joins or leaves the shift. Just tick the box Watch attendance in builder editor in chosen shift(s). Make also sure that the emails are turned on in the Notification settings.
Alternatively, you can turn on Global attendance watcher in Notification settings - with this ON you will receive notification about all attendance changes.
Despite the possibility of staff member self-registration, you still have complete control over the occupation of each shift. If you have a reason for a particular staff members not to perform a specific job for which they have applied, you can remove them from that job. Likewise, you can lock positions so they are not available for self-sign up or hide them so staff members do not even see them in the list of available shifts.
💡Tip: Combine both approaches of staff assignment - add the best-skilled staff to the shift by yourself and leave the rest of the slots open for self-signup.
Attachments 🖇️
Your staff member can upload any attachments after the event on the shift detail page. Allow your workers to do so in Agency settings > sections User account and Time limits for the worker to upload.

The admin can access the shift attachments from the menu > section Work > Overviews > Shift attachments. There you have an option to view or download them.

Amongst the supported formats are JPG/JPEG, PNG, GIF, ZIP, DOC/DOCX, XLS/XLSR, PDF,...