
Turning the new table on
- Go to Finances → Invoices → All invoices.
- Click Try the new table.
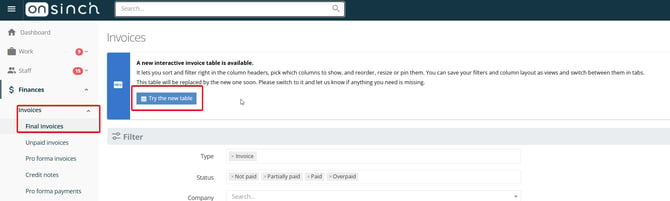
❗Note: The new table is marked BETA while we polish it. The old list is always one click away (see Switching back to the old table), and your feedback will shape the tables that follow.
What you can do with the new table
- Sort and filter in the table itself – filters appear as chips above the table, sorting is one click in the column header.
- Choose your columns – show only what you need, add more when you need them.
- Reorder, resize and pin columns – keep key columns (for example Number) in sight while you scroll sideways.
- Save views – keep a combination of filters, columns and sorting, and switch between views in tabs.
- Adjust the display – row height, text wrapping and units in the column header.
- Decide which row actions get their own column and which move into the row menu.
- Work in full screen when you need more room.
Getting around the page
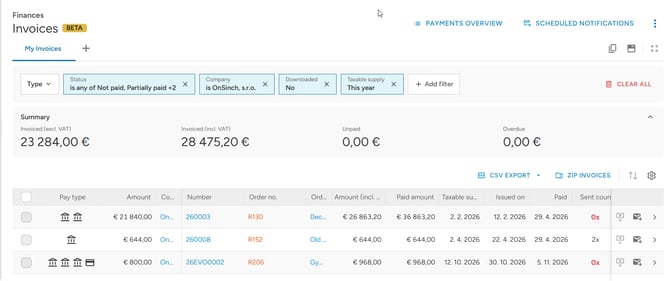
|
Area |
What it does |
|
View tabs (top left) |
Each tab is a saved view. Click a tab to switch. + lets you save the current setup as a new view. |
|
Copy view / Manage saved views / Full screen (top right) |
Three icons: copy the current view, manage your saved views, or switch to full screen. |
|
Filter bar |
Your active filters as chips, the Type filter, Add filter and Clear all. |
|
Summary |
Totals for the current selection: invoiced excl. VAT, invoiced incl. VAT, unpaid and overdue. Collapse it with the arrow if you need space. |
|
CSV export / ZIP invoices |
Export or download invoices. |
|
Sort and settings icons (above the table) |
Quick sorting and the table settings. |
|
Table |
Your invoices. Click an invoice number to open it. |
Filtering
Filters live in the bar above the table. Each active filter is shown as a chip with its name and value, for example Status – is any of Not paid, Partially paid +2.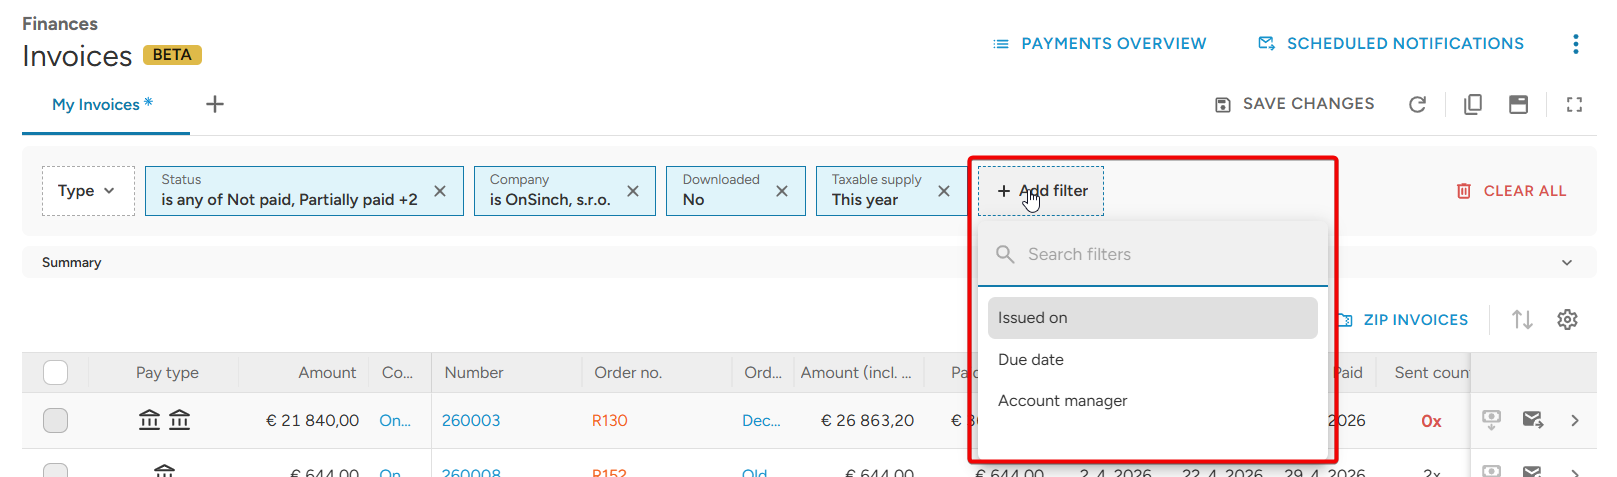
Add a filter
- Click Add filter.
- Search for or pick a filter from the list.
- Set its value in the window that opens.
Edit or remove a filter
- Click a chip to change its value.
- Click × on a chip to remove that filter.
- Click Clear all to remove every filter at once.
Operators
Filters with a list of options (such as Status or Type) let you choose how the options are applied:
- is any of – matches any of the ticked options
- is none of – excludes all ticked options
- is – matches exactly one option
- is not – excludes one option
Use the search box inside the filter to find an option quickly.
Filters available
- Type – Credit note, Invoice, Custom type, Penalty invoice, Pro forma invoice, Receipt, Storno invoice
- Status – Overpaid, Paid, Partially paid, Not paid
- Company, Downloaded, Taxable supply
- Under Add filter: Issued on, Due date, Account manager
💡Tip: A date filter such as Taxable supply – This year always follows the current period, which makes it a good base for a saved view.
Sorting
There are two ways to sort:
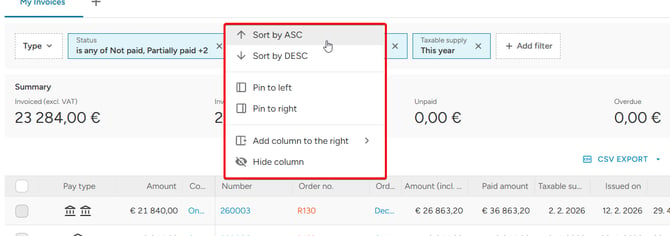
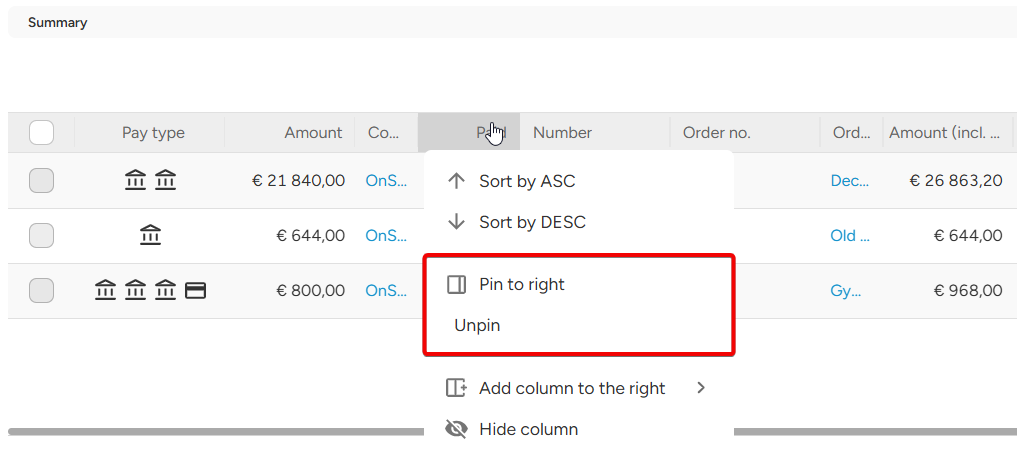
- From a column header – click the header and choose Sort by ASC or Sort by DESC.
- From the sort icon above the table – choose Ascending or Descending, then pick the column to sort by.
|
Option |
What it does |
|
Sort by ASC / DESC |
Sorts the table by this column. |
|
Pin to left / Pin to right |
Keeps the column fixed at that edge while you scroll. |
|
Unpin |
Releases a pinned column. |
|
Unit in header |
Moves the unit (for example the currency) into the column header, so the cells show only the number. |
|
Add column to the right |
Adds another column next to this one. |
|
Hide column |
Removes the column from the table. You can bring it back in Columns & actions. |
Resizing columns
Drag the edge of a column header to make the column wider or narrower. To size all columns at once, use Fit width to content or Stretch to fill table in the table settings.
Table settings
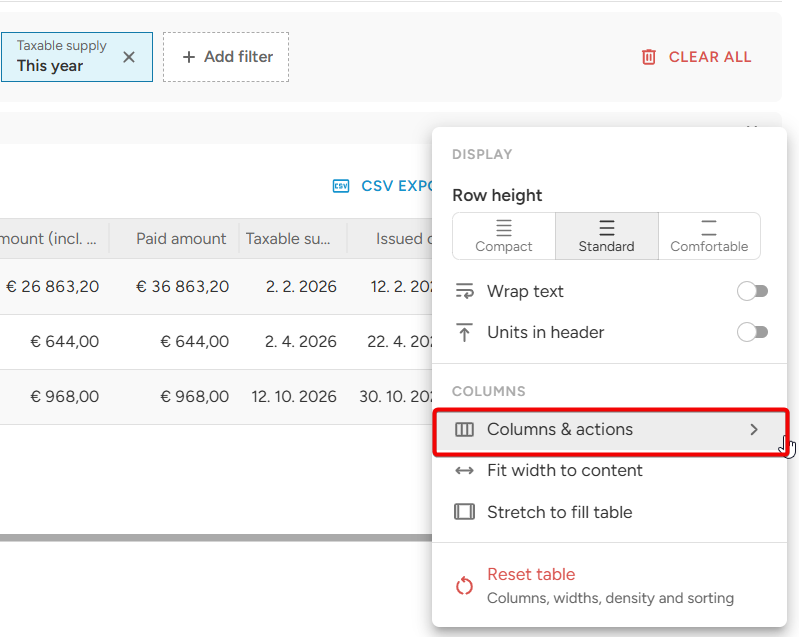
Click the cog icon above the table to open the settings.
Display
- Row height – Compact, Standard or Comfortable. Compact fits more rows on the screen.
- Wrap text – show long values on several lines instead of cutting them off.
- Units in header – show units once in the header instead of in every cell.
Columns
- Columns & actions – the full layout panel (see below).
- Fit width to content – sizes every column to its content.
- Stretch to fill table – spreads the columns across the available width.
Reset table
Reset table returns columns, widths, density and sorting to the defaults.
Columns & actions
Open the cog icon and choose Columns & actions to manage the whole layout in one place.
Columns
- Drag a column by its handle (⋮⋮) to change the order.
- Use the two pin icons to pin a column to the left or right edge.
- Use the eye icon to show or hide a column.
- Use the search box to find a column quickly.
- Show all and Hide all change every column at once.
Available invoice columns: Pay type, Amount, Company, Number, Order no., Order name, Amount (incl. tax), Paid amount, Taxable supply, Issued on, Paid, Sent count, Downloaded, Due date, Pay date and Payment.
Pin actions
The row actions Pay, Send invoice and View can each get a column of their own at the edge of the table. Actions without a column of their own stay available in the row menu, which keeps the table tidy.
💡Tip: Give a column to the actions you use every day and leave the rest in the row menu.
Saved views
A view remembers your filters, columns and display settings, so you can return to a setup in one click. Views are personal: each user has their own, and your changes don't affect your colleagues.
Save a view
- Set up the table the way you want it.
- Click + next to the view tabs.
- Choose Save as a new view.
Switch between views
Click the tab of the view you want. The + menu also lists your other saved views.
Manage and copy views
- Manage saved views (top right) – manage your views.
- Copy view (top right) – duplicate the current view as a base for a new one.
Ideas for views
- Unpaid invoices – Status is Not paid or Partially paid, with the Due date column shown.
- To send – Sent count column and a column for the Send invoice action.
- Accounting – Amount (incl. tax), Paid amount, Pay date and Payment, ready for CSV export.
- Credit notes – Type is Credit note.
Full screen
Click the Full screen icon at the top right to give the table the whole window. Click it again to leave.
Switching back to the old table
Click the ⋮ menu at the top right of the page and choose Switch to old table. To use the new table again, click Try the new table.
💡Good to know:
- The new table is in beta, so some details may change.
- It is currently available for invoices only. Other lists will follow gradually.
- Your arrangement is saved with the view.
- If invoices seem to be missing, check the filter chips and use Clear all to see everything.
- If you lose track of your changes, Reset table restores the defaults.